Halloween Costume ideas 2015
Latest Post


How To Resume Unfinished Torrent Download-DTWe usually use utorrent to download Torrent file like movies, softwares, videos. These are large in file size. Through many torrent download clients we can pause  downloads but sometimes we need to reinstall our operating system while files are downloading. So we cannot resume unfinished torrent file after reinstalling OS.We have to start it from beginning. Today I am going to tell you how to resume unfinished torrent download.

1. Always use the µTorrent client to download torrent files. If you do not have µTorrent, download from here.
2. Do not use magnet link, download manually.
3. You have noticed that before downloading complete, it creates the file fully in a specific folder on a specific drive. But we cannot use it. After downloading complete we can open/use that file.
4. Move those files & folders and torrent link files in a safe place before installing the OS.
5. Now install the OS. After installing the OS, install µTorrent. And copy the torrent file and other folders to the same drive and same folder.
6. Open the torrent file through µTorrent. Now in µTorrent window right click on this torrent file and right click on it. And then click on Force Re-Check.

How To Resume Unfinished Torrent Download-DT

Now downloading will resume from where it was stopped.

Your Computer Welcomes You After Start up With Its own Voice - DT
Hope you all saw many Si-Fi movies. In those movies you must see that the computer welcomes its user when they turn on the computer.
How it will be if your computer welcomes you after start up?
Today I am going to tell you how to set up your computer which will welcome you with its voice after every start up without using any software. Just with the help of Notepad, we will make the whole process.
Step 1 :(Open Notepad)

First of all you need to open notepad.To open Notepad follow the steps :
Start > All Programs > Accessories > Notepad

Step 2 : (Writing code and saving the file)

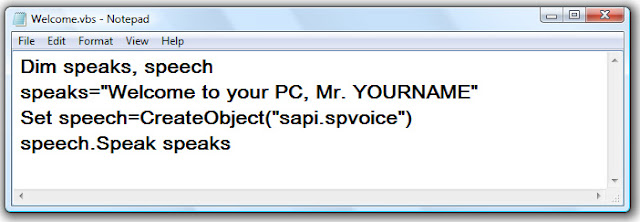
Now in Notepad write the below code-
Your Computer Welcomes You After Start up With Its own Voice - DT
Dim speak,speech
speaks="welcome to your PC,Mr.Yourname"
set speech=Createobject("sapi.spvoice")
speech.Speak speaks

Replace  Welcome to your Computer, Mr. YOURNAME with your own.
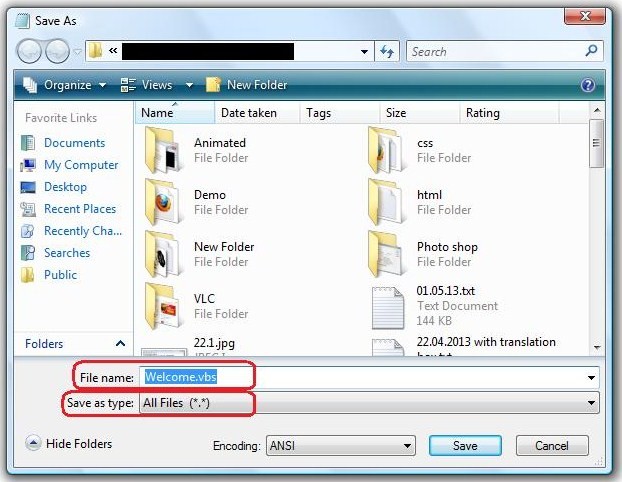
And now you have to save it in vbs format.

Your Computer Welcomes You After Start up With Its own Voice - DT
File > Save as > 
  • In the File name box write Welcome. vbs
  • In the Save as type select All Files (*. *)
Now click on Save.
 Step 3 : (Adding in startup programs)
To launch the program after every start up you have to add the file in the startup program list.
  • So first of all Copy the Welcome .vbs file.
  • And paste the file in the directory below -
    C:\Documents and Settings\All Users\Start Menu\Programs\Startup ( For all windows xp/vista/7/8 )
    C:\Users\{user name}\AppData\Roaming\Microsoft\Windows\Start Menu\Programs\Startup ( For vista/7/8 )
N.B. : AppData folder is generally a hidden folder so before doing this unhide this folder
Now you are done. Now restart your computer and see the magic.

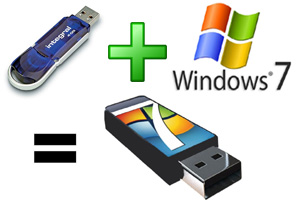
How to make pendrive/Usb Bootable easily-DTGenerally we install  windows from CD/DVD Rom. It takes more time to install windows. Have you ever tried to install windows from Pendrive/USB Stick?
If you install windows from USB Stick/Pen-drive , it takes less time than DVD/CD Rom. If your DVD or CD Rom is not working then it  is the best way to install windows. In  which computers (Netbooks) DVD Rom is not available, Boot-able pendrive is most important thing to install OS, Live DVD/CD and others.
So today I am going to tell you what is the process to make Pendrive bootable. I will tell two easy methods-
1. Dos/cmd Method
2. Software method

Method 1
:

( Make Pendrive/ USB Stick bootable by Command Prompt )
Without any software using command prompt you can make bootable pendrive very easily.Just follow these below steps-
Step 1 :
First of all format your Pendrive/USB stick in NTFS format.
If you are using Windows Vista/7/8 then format the pendrive just in NTFS format not in FAT32.
Format with NTFS
Or you can use Command prompt to format your pendrive in NTFS format.
Make pendrive bootable using dos-DT
  • Open command prompt (Start >All Programs >Accessories > Command Prompt)
  •  Write command :
    convert H:/fs:ntfs   [ H:=Pendrive's letter ]
  • After sometime pendrive will be formatted in NTFS format.
 Step 2 :
 Now insert the CD/DVD into your DVD drive.
Step 3 :
Now go to command prompt and Run it as Administrator
(Start >All Programs >Accessories > Command Prompt [Right click >Run as Administrator])
Step 4 :
 Write command :
       F:          [ F:= in this drive you inserted windows dvd/cd,change it as your computer shows ]
       cd F:\boot     
       bootsect /nt60 H:    [ H:=Pendrive's letter ]
Step 5 :
You are almost done...
Now copy the whole DVD/CD and paste in the Pendrive/USB Stick.
 Now you can setup windows from your pendrive.No need of DVD/CD drive.
Method 2 :
( Make Pendrive/ USB Stick bootable by a Software )
I have tried many softwares to make a USB stick bootable and these cannot satisfy me. After long time I got a software, by which you can make bootable pen drive easily. This software size is only 700 KB.
 Step 1 :  
First of all download it from the below link-
Step 2 :
Unzip it and run it.A Window will appear-
How to create pendrive bootable-DT
Step 3 :
Now select your Pendrive ,Tick in Quick Format and select the ISO/DVD/Source File.
Bootable pendrive-DT
 Now click Do it!
You are done, The software starts working ..
Easy way to make bootable pendrive-DT
After complete, below window will appear-
Bootable pendrive is ready-DT
Your Bootable windows pendrive is ready.
N.B. :
In Boot Menu set the pendrive as first boot device in BIOS setup

For a website navigation bar / menu bar is very important. Using the menu bar you can go everywhere in the blog. So you have to choose proper menu bar for your blog/website. It should be attractive.
Demo
Just take a look these links for the code::


How to Add this in Blogger ?  
It's very simple.
1.In your blogger template,find     </b:skin> 
2. Paste THE CSS part above </b:skin> 
3.Now go to Layout in your blogger Dashboard.
4. Click on "Add new gadget". Then in a new HTML/JavaScript page element , paste " The HTML " part
And click Save.
Change Place:
In the html part you can change :

<li class=" home "> <a href=" # "> Home </a></li>
[Change ' # ' with your own link and '   Home  ' as you your website needed]

( N.B : Be careful while working with these codes. Please make a backup of your TEMPLATE. )

Easy way to make portable software - Dev TunesWe work with various softwares everyday. If you are working in your home. So you have all softwares installed in your PC. Then no problem.
But when you work on any other PC then you face the problems that the software you need that is not installed on that computer. Suppose you are working in a cyber cafe, at that time you need a software to finish your work. But in that computer that software is not installed. So you have to download that software and then you have to install the software. It is a waste of time and money too.
If you have the portable version of that software in your pendrive then no need to install that software. Just plug and work.
In this tutorial I am going to tell you, how to make a portable software easily.After creating the portable software copy it into your pendrive and use it anywhere.
Here I'm going to create Portable VLC media player. To make any other portable software the process will be same.
Step 1 :
Go to the folder in your computer where VLC media player is installed.
( C:\Program Files\VideoLAN\VLC )
And select all files. (Ctrl+A)
How to make Portable Software easily 
How to make portable software easily

Step 2 :
Now make Archive of these files with Winrar.
How to make portable software easily with winrar
Step 3 :
Now there will open a window like below -
How to make portable software easily
Step 4 :
Now set up the General options like the above image.
Step 5 :
Now click on Advanced options. Then select SFX options..
How to make portable software easily
Step 6 :
Then one more new window will open.In that window under General option,set the "Setup program" which will execute after clicking the portable software.Write the name of that .exe file. In this case " vlc.exe " is the setup program which runs after extraction.
How to make portable software easily-dev tunes
Step 7 :
Now click on the Modes option and tick like the picture given below-
How to make portable software easily-dev tunes
Step 8 :
Now click on the Text and icon and enter the Title of SFX window. And enter a logo image in Load SFX logo from the file box as you wish.
How to make portable software easily-dev tunes
Step 9 :
Now click on " OK " and then again click on " OK " in the previous window.
Now you are done Archiving in progress.
After complete archiving the portable VLC media player will be ready to use.
making of Portable vlc media player- Dev Tunes

After completing vlc portable version software is ready and double click on it.
making of Portable vlc media player- Dev Tunes
After the decompression portable vlc player will start.

Copy this " vlc portable.exe " file in your pendrive and use it anywhere without installing software. Thus you can make a portable version of any software.
( N.B. : To make these portable software you need WinRAR software installed in your computer. )

When you turn on your desktop computer, normally you hear a Beep sound coming from your CPU. Then your computer starts. But sometime you heard many Beep sounds from your CPU. Then you found there are some problems with your computer. Result your PC does not start.
Today I am going to tell you how can you find out the problems hearing those beeps.
So when the computer begins to boot, listen very carefully to the BEEP sounds


1 Beep :
Your computer has no problem. The PC starts normally.
2,3 & 4 Beeps : Check the  RAM whether it is in the right slot in your CPU. Remove RAM from the slot and reinsert in it if needed.
5 Beeps : Check out motherboard connections properly with all cards ( like-Graphics card, Sound card etc. ).
6 Beeps :
Check the keyboard connection with motherboard properly.
7 Beeps :
Check the processor's connection whether it is connected properly.
8 Beeps : If there is any problem with your Graphics card, then these beeps can be heard.
9 Beeps : This is very unusual.If there is a major problem with your bios, then these beeps are heard.
10 Beeps : Means CMOS Chip is not working.
( N.B. : To hear beeps, you should have internal speaker in your CPU. Some Motherboards provide an inbuilt speaker. If they do not provide any speaker, you can add speaker manually. )

You all know about the Telephone answering machine.It is very helpful when you are not in home.In the same way if your email responds after receiving an email that you have got the mail.
Or suppose you are not in home,will be at home after 4days but someone sent an email.And your email replies automatically that you are not in home or any preloaded message like answering m/c.If anyone needs to contact you urgently then after reading your message he will contact you by other medium ( like-Mobile phone ).
It is possible in Gmail as well as in Yahoo !Today i am going to tell you how to setup an email answering m/c.It is fully free of cost without any kind of software or hardware.
For Gmail
Step 1 :
First log into your gmail account.
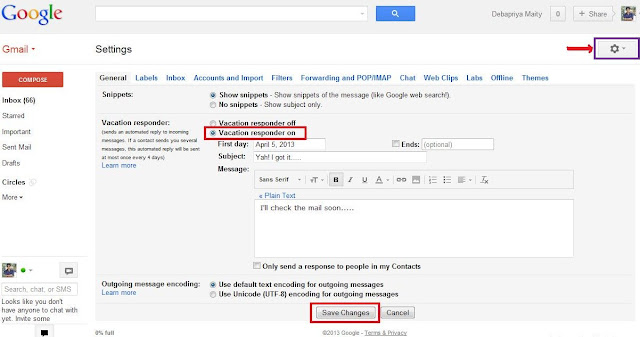
And Click on "Settings" at the top right side [ In Standard Gmail view ] or click on " Settings " [ In basic HTML view] at the top-right side of the page.
Email Answering Machine Setup
Step 2 :
In " General " tab ,there is an option " Vacation responder ".
Click on " Vacation responder on "
Step 3 :
Now write subject in the subject box.And also write the message in the message box.
now click on " Save Changes ".
Now when you receive a mail,automatically a reply mail will be sent to the sender.

For Yahoo!
Step 1 :
Log into your Yahoo account
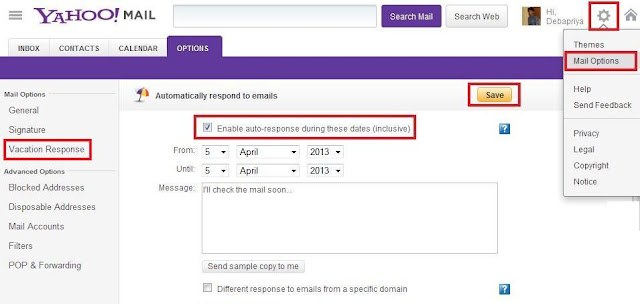
Click on the settings button at the top right of the page.

Yahoo! answering m/c Setup steps

Step 2 :
Then click on " Mail Options ".
Now in Options Tab click on " Vacation Response ". 
Step 3 :
Tick on " Enable auto-response during these dates(inclusive) ".
Step 4 :
Just enter dates.Write your message .Click " Save "

That's all.You are done.
Now when you received an email,an automatic reply will be sent.

Word to PDF
PDF = Portable Document File.

Without needing to have the same application or fonts on your computer, PDF files let you view and print a document as the author designed it,
  • To view or print a PDF file, you need the Adobe Reader®, version 5 or later, on your computer. You can download a free copy of Adobe Reader® from the Adobe website.
  • Installation instructions are available from the Adobe website.
You read PDF files every day, in your office, home, schools, colleges in one Line "You use PDF files EVERYWHERE".
Suppose you are working in MS WORD but you need that file in PDF format immediately. But It is very difficult to make a pdf file via Adobe/Acrobat. It is a lengthy and complicated process. Or else you need to install Word to PDF converter on your computer (Like: Quick Word to PDF) or you Upload the file in a website it is converted into PDF (Like: www.pdfonline.com/convert-pdf/ etc. etc. ).
But have you ever tried to make your own PDF file in your computer in OFFICE platform?
Ans: Yes, but don't know the procedure.
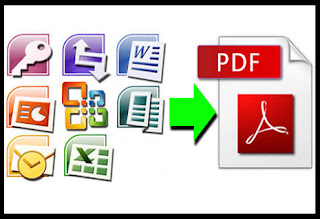
Today I am sharing a tip to make PDF files from a MS WORD file or even from any other MS OFFICE applications in the MS OFFICE platform in your computer instantly.
For this you have to install a small plugin provided by Microsoft ®. Click the below Download link to download the plugin for MS Office 2007.

Download Word to PDF

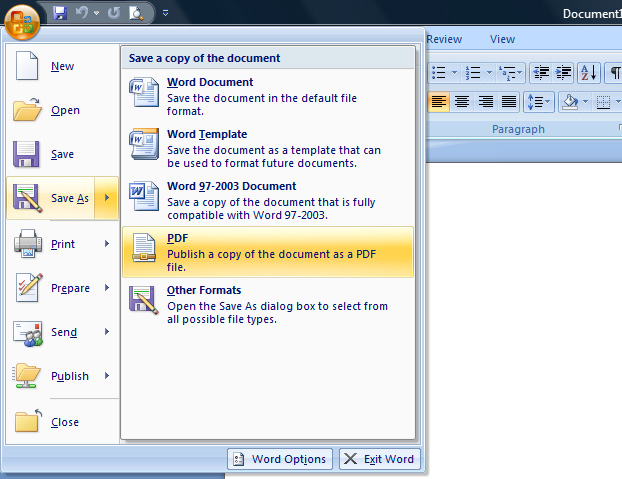
  • In the page Click " DOWNLOAD " as shown in the below picture.
Word to PDF

To install this download:
  • Download the file and save the file to your hard disk.
  • Double-click the SaveAsPDF.exe file on your hard disk to start the Setup program.
  • Follow the instructions on the screen to complete the installation.
Instructions for use:
  • After you install this SaveAsPDF, open the document which you want to publish
  • Select save to PDF from the Office or File menu.
Word to PDF

This download works with the following Office programs:
  • Microsoft Office Access 2007
  • Microsoft Office Excel 2007
  • Microsoft Office InfoPath 2007
  • Microsoft Office OneNote 2007
  • Microsoft Office PowerPoint 2007
  • Microsoft Office Publisher 2007
  • Microsoft Office Visio 2007
  • Microsoft Office Word 2007

Social Subscription Gadget-by DT
Now a days, different Social Networking Sites are one of the most powerful medium in optimizing SEO. Today I am going to tell you about a social media gadget which is very easy and attractive.
 
Demo

Just take a look these links for the code::

How to Add this in Blogger ?  
It's very simple.
1.In your blogger template,find     </b:skin> 
2. Paste THE CSS part above </b:skin> 
3.Now go to Layout in your blogger Dashboard.
4.Click on "Add new gadget".Then in a new HTML/JavaScript page element , paste " The HTML " part
And click Save.
Change Place:
http://feeds.feedburner.com/devtunes (Change with your feedburner link.)
  
http://feedburner.google.com/fb/a/mailverify?uri=devtunes (Change the feedburner username.)
  
http://twitter.com/devtunes (Change with twitter username.)
  
http://facebook.com/devtunes (Chang with your facebook page link.)

<input type="hidden" value="devtunes" name="uri" /> (Change with your feedburner username.) 
( N.B : Be carefull while working with these codes.Please make a backup of your TEMPLATE. )

Suppose you are working on a computer using the internet, suddenly you found that there is no internet connection. It is a very common thing. But you have to check your emails for your work. Without the internet you cannot read emails.
Now I am going to tell you How to Read, Compose or Even send Emails in Gmail while there is no internet connection (Offline). You can send emails. Whenever your computer gets connected to the internet all mails will be sent automatically.
So use this trick you need Google Chrome Browser. If you don't have it, Download it from the below link.
Step 1:
After installing Google Chrome, You have to login into your Gmail account.
Then you have to go    Offline Gmail Setup Page  .
Now on the top-right of that page, click on   + ADD TO CHROME  

Step 2:
Now a new window will open. In that window click on " Add "

Step 3:
Now click on   LAUNCH APP  

Step 4:
A new tab will open. On that page Select " Allow offline mail" and then click on " Continue ".

That's all. Your offline Gmail is successfully activated. You are almost done. Now whenever you lost your internet connection, then to access your gmail account just go to the below link in your Google Chrome Browser.
Link
To send email, just click on Compose, after composing mail Click on Send as link normal procedure to send emails.
When your computer gets connected to the internet email will be sent automatically.

Debapriya Maity

{google-plus#https://plus.google.com/107141682524970441767}

Contact Form

Name

Email *

Message *

Powered by Blogger.
Javascript DisablePlease Enable Javascript To See All Widget