Halloween Costume ideas 2015
Articles by "Web Design"

How to host a website in Google Drive with Custom Domain
Google Drive is definitely a very good service provided by Google. It lets us to store files online.
From now Google Drive will allow web developers to host a website in it for free with 15 GB space. They announced it officially. It means all you do have to store your HTML, JavaScript, CSS files in it. Just like how you upload files requires for a website to a server.
It's a small update but a big news for web developers. So I made a website and hosted it in Google Drive. You can see live demo here :
 
Though I don't recommend you Google Drive as main hosting but it is very useful for demo website. If you are a designer then you need to demo your work for your client, then this is very useful.
In previous article I told you Why you should let Google Drive to host a file and How to store files in Google Drive. (I showed about how to host JavaScript or CSS file. Same way you can upload your files.
What you needed to host a website in Google Drive. Google's goal is mainly to get more people using Google Drive in internet as well as computing services. If you are already a user of Google Drive you may find this more effective than SkyDrive or Dropbox.

What to do to host a website in Google Drive?

  • Make your necessary files for the website.
  • Create a Folder in Google Drive
  • Share the folder as " Public on the web "
  • Upload your files (HTML, JavaScript, CSS and other files) in that folder.
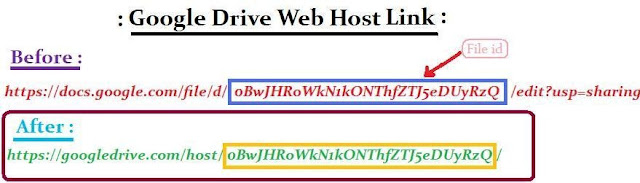
  • Share the URL that looks like https://googledrive.com/host/....

Complete Guidelines with example for hosting a website in Google Drive :

Step 1 : ( Developing necessary files and folders for a website )

How you build a website that's your choice. You can make website trough simple html editor or you can use third party software ( like Artisteer ). So any how develop your necessary files. It may be consisted of HTML, JavaScript, CSS or any other files. A web developer is well known about it.
For example I use " Artisteer " to make necessary files in very short time. Here is the screenshot of necessary files : 
How to host a website in Google Drive with Custom Domain

Step 2 : ( Creating a folder in Google Drive and share as "Public on the web" )

  • Firstly go to Google Drive and click on the CREATE option, then select Folder and name it. ( Like : Dev Tunes Website )
How to host a website in Google Drive with Custom Domain
  • After creating the folder right click on it and click on " Share ".
How to host a website in Google Drive with Custom Domain
  •  And select " Public on the web " under " Who has access ".
How to host a website in Google Drive with Custom Domain

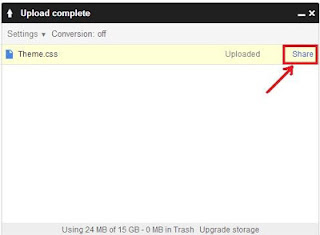
Step 3 : ( Uploading the files and folders )

Next in that folder you have to upload your files and folders. So click on the upload icon next to CREATE option and upload the files ( and folders if necessary ). For example see below :
How to host a website in Google Drive with Custom Domain

Step 4 : ( Get the link of your Website hosted in Google Drive )

The last step is getting the link. To get the link Right click on your desired file ( like: index.html ) and click on " Details " then in right side details box you can find your link somewhat looks like

  
Now your website is online. You are done.

How to add a Custom Domain for a Google Drive hosted Website ?

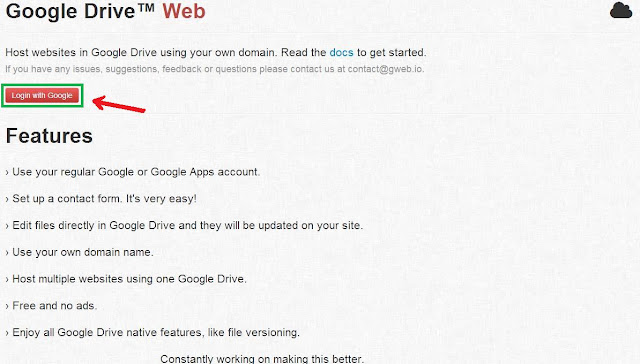
Although Google does not allow to add a custom domain for Google Drive hosted website. But with a the help of this website : http://gweb.io/ you can add a custom domain for your website. Just follow the steps :

Step 1 :

On that website click  " Login with Google ". Then it will be redirected to a request permission Page and there click " Accept ".

How to host a website in Google Drive with Custom Domain
Then it will take you a page containing your Google Drive files and folders. There you can easily find the folder in which your website's files and folders are hosted.
Click on the " Link " button beside the desire folder name. See an example :
How to host a website in Google Drive with Custom Domain
Then URI would somewhat like devtunes.gweb.io and " Domain? " box will be blank. Now go to your browser, type { devtunes.gweb.io } and enjoy your website. 
Note : The folder should contain an index.html file of your website. Otherwise it will just display a list of files present in that folder.

Set up your own Domain

And in the " Domain? " box you can add your Custom Domain. But before adding  a custom Domain you have to do two things.
1. Modify your domain's DNS :
Login to your DNS management account. Add or modify [ www.example.com ] CNAME record and point it to [ example.gweb.io ].
2. Set your domain on gweb.io :
You have to go to the gweb.io panel and set [ www.example.com ] as the domain for [ example.gweb.io ]
  • Without www, if you want to access example.gweb.io via example.com , you need to set up the DNS For [ example.com ] like this:
Add/modify three A records and point them to:

    75.101.163.44
   75.101.145.87
   174.129.212.2

    N.B. : Don't forget to add the domain [ example.com ]  in the gweb.io panel beside the URI link. See Docs for further information.
Now in the address bar type [ example.com ] or [ www.example.com ] and enjoy your website.

How to host Javascript or CSS in Blogspot using Google DriveHello guys, you all know that for a webmaster JavaScript and CSS are the most important things to develop a website.
  • To define the style information <style> tag is used in an HTML document. CSS coding is put between two <style></style> tags. It describes that how an HTML document should render in a Web Browser. 
  • <script>tag is used to define scripts like JavaScript. This tag contains Scripting statements or an external file/document through "src" attribute.
And each HTML document may contain multiple <script> tag.
Generally these consist  of very long code. And multiple Script slows down the page loading rate and also decrease the rate of SEO. So a webmaster prefers to add their whole stylesheet/script in one file which they can upload in a website and after that they can apply these  very easily.
In Blogspot you can use JavaScript and CSS whatever you want. But blogspot does not let us to host Javascript and CSS file. We can add raw code. So most of us added Javascript and CSS directly into blogger template. But the template editor editor is very small in size. So our faces many problems while editing a template.
Although Blogspot has few limitations that stop you from hosting a Javascript or CSS file. So you have to upload these to a third party website. But also on those website sometimes you faces problem like-those website loading speed is not good, not enough bandwidth, sometime you have to pay for hosting above all security.
Luckily Google Drive solves these problems. Using Google Drive we can easily host anything as well as Javascript or CSS or HTML file for free. And you can use these files directly to your website.
Today I will show you How to host JavaScript or CSS in Blogspot using Google Drive .

Why you should let Google Drive to host files for you ?

  • Lots of Space: Google drive lets you 15 GB space for hosting to a regular account. It is sufficient to host a large number of Javascript/CSS files. However you can upgrade your account. If you do not want to upgrade  just use this service through another an account and you will get another 15GB space. There is no limitation to create multiple accounts in Google. So Cheers guys you can  put your whole computer in Google Drive. LOL :-D.
  • Reliable as well as Dependable : With unlimited bandwidth Google Drive provides you to host anything as you like with full freedom. There is no limitation or any kind of condition.
  • Better security : Google has always proven that they are the best in security all companies. Google Drive is one of their services with unlimited bandwidth. Moreover to serve maximum security Google Drive usages HTTPS encryption to keep your document safe.
  • Automatic Backup : Google Drive creates a backup (new revision) of your file whenever you make changes to a file. Google tracks your changes all time. So you can revise the file and restore that version.
  • Sharing Option : You can share a file to anyone or you can make it private. You can select the option for others to comment, share, view or edit your stuff.
  • Free Free Free : Completely Free : You can use all these features for FREE. No charges apply. 

How to host a JavaScript or CSS in Blogspot with Google Drive ?

There are several third-party Apps that let you to host your Javascript or CSS like Google Code, Google apps, Google Appbot. But the procedure to host files is more complex than Google Drive. Hosing at Google Drive is very easy and no need to worry about the bandwidth.
Step 1 : ( Creating .js/. css file from your template )
To host JavaScript/CSS you need to make .js/.css file from your template. To make these file you need Notepad.
First of all : Go to blogger.com » Your blog » Template » Edit HTML » And search for  <b:skin><![CDATA[/*
 and copy the code till   ]]></b:skin> 
How to host havascript or CSS in Blogger
Then paste it in Notepad. And also remove it from the template. After pasting it in Notepad save it [ name.css ]
The extension should be in .css so that a web browser can understand it as a StyleSheet. See an example:
How to host havascript or CSS in Blogger

Step 2 : (Creating a Folder in Google Drive )
Now you have to upload the file to Google Drive.
First go to Google Drive and Log in with your Gmail account.
Now you have to create a New Folder where you can store your files. So click on CREATE then click on Folder in the drop down list. Now name the new folder whatever you want. Now Click on Create. For example see the below image :

How to host havascript or CSS in Blogger
Step 3 : (Uploading the file to the Folder)
Now double click on the newly created folder. Then click on the Upload icon on the left side of the window beside the CREATE button. And a drop down list will appear and then select Files.
How to host havascript or CSS in Blogger

Then select the files and Click Open.

How to host havascript or CSS in Blogger
Then a small uploading window will appear on the right side. After uploading complete click on " Share " . See example:
Then a new window will appear. And then click on " Change "(Who has access). An another window will open
After that select " Public on the web ". Then click "Save". Then click " Done ".
For example see the below image :
How to host havascript or CSS in Blogger
Step 4 : (Get the proper Hosting Link )
And the second last step is to prepare the proper hosting link of the .css file. So right click on the file which you uploaded few moments ago and select share.
How to host havascript or CSS in Blogger
After that copy the URL under " Link to share "
How to host havascript or CSS in Blogger
The copied URL would somewhat look like :
https://docs.google.com/file/d/0BwJHRoWkN1kONThfZTJ5eDUyRzQ/edit?usp=sharing


Replace the link https://googledrive.com/host/[File id]
Remember: Your file id should be same before and after the change.
Example:
Google doc link:
https://docs.google.com/file/d/0BwJHRoWkN1kONThfZTJ5eDUyRzQ/edit?usp=sharing
Google Drive Host link:
 https://googledrive.com/host/0BwJHRoWkN1kONThfZTJ5eDUyRzQ/

Step 5
 : (Adding the hosted .css into Blogger )
After preparing the hosting code now the time to add the link to blogger template. Go to blogger.com » Your Blog » Template » Edit HTML » And put the code before <head> tag as below the structure.
<link href="https://googledrive.com/host/your-file-code" rel="stylesheet"></link>
Do not forget to remove the CSS code as I told in Step 1.
In the same process you can host a Java script. Then the coded structure will look like :
<script src="https://googledrive.com/host/0BwJHRoWkN1kOOE41LWlUMXhTcGs" type="text/javascript"></script>


How To Find HTML Color Code InstantlyFor making a website or editing a blog template appropriate color is very important. For web design every color has a color code in HEX value ( like: White- #FFFFFF ). We all know about it.
Sometimes we choose a color but we cannot find the HTML color code for that color. So we search in Google or else use a website to find the color code.

 
 There are so many websites to find the HTML color code for a specific color like
w3schools.com
HTML Color Codes 
Colorpicker.com
But when you are working offline then is is very hard to find that color code. Or you saw a color in a website/application/document. You liked it very much. But you cannot find that code for that color on those websites. So I am going to tell you How to find HTML color code instantly.
  • Just download this software (420.67 KB) from the below link.
How to find HTML color code instantly
  • Install it on your computer. After installing it will show in your Task Bar. Like this-
How To Find HTML Color Code Instantly
 This Software is developed by Instant Eyedropper.
How to use ?
Just Click on that icon in your task bar and hold it and then drag the mouse pointer to the desired color on your screen.

How To Find HTML Color Code Instantly

It will work everywhere in your computer screen. So you can pick color code from any application or document or website or in short whatever you see on your computer screen. In the above screenshot, you clearly see that how this software shows HTML color code from Google search page.


For a website navigation bar / menu bar is very important. Using the menu bar you can go everywhere in the blog. So you have to choose proper menu bar for your blog/website. It should be attractive.
Demo
Just take a look these links for the code::


How to Add this in Blogger ?  
It's very simple.
1.In your blogger template,find     </b:skin> 
2. Paste THE CSS part above </b:skin> 
3.Now go to Layout in your blogger Dashboard.
4. Click on "Add new gadget". Then in a new HTML/JavaScript page element , paste " The HTML " part
And click Save.
Change Place:
In the html part you can change :

<li class=" home "> <a href=" # "> Home </a></li>
[Change ' # ' with your own link and '   Home  ' as you your website needed]

( N.B : Be careful while working with these codes. Please make a backup of your TEMPLATE. )

Social Subscription Gadget-by DT
Now a days, different Social Networking Sites are one of the most powerful medium in optimizing SEO. Today I am going to tell you about a social media gadget which is very easy and attractive.
 
Demo

Just take a look these links for the code::

How to Add this in Blogger ?  
It's very simple.
1.In your blogger template,find     </b:skin> 
2. Paste THE CSS part above </b:skin> 
3.Now go to Layout in your blogger Dashboard.
4.Click on "Add new gadget".Then in a new HTML/JavaScript page element , paste " The HTML " part
And click Save.
Change Place:
http://feeds.feedburner.com/devtunes (Change with your feedburner link.)
  
http://feedburner.google.com/fb/a/mailverify?uri=devtunes (Change the feedburner username.)
  
http://twitter.com/devtunes (Change with twitter username.)
  
http://facebook.com/devtunes (Chang with your facebook page link.)

<input type="hidden" value="devtunes" name="uri" /> (Change with your feedburner username.) 
( N.B : Be carefull while working with these codes.Please make a backup of your TEMPLATE. )


When we are talking about a website one the common thing is menu bar.No matter if vertical or horizontal, simple or complex, a menu is essential and it has to look that way.
Today I am going to show you how to create a cool good-looking sexy menu bar using CSS3.
Just take a look of these links for the code::
THE CSS
THE HTML

How to Add this in Blogger ?  
It's very simple.
In a new HTML/JavaScript page element paste as following :

    <style type="text/css">
    [ THE CSS ]
    </style>
    [ THE HTML ]
And click Save
Another process :
1.Add The CSS above    </b:skin>    
2. Paste THE CSS part
3.After    <body>     paste THE HTML part where you want the Menu Bar.   
( N.B : Be carefull while working with these codes.please make a backup of your TEMPLATE )

Debapriya Maity

{google-plus#https://plus.google.com/107141682524970441767}

Contact Form

Name

Email *

Message *

Powered by Blogger.
Javascript DisablePlease Enable Javascript To See All Widget