Halloween Costume ideas 2015
Articles by "Windows"

Games on Windows 8
Did you play Chess Titans, Mahjong Titans,InkBall, Minesweeper,Purble Place, FreeCell, Hearts, Solitaire, Spider Solitaire ? Playing these games is one the best way to time pass. Whenever I am free I play Hearts.
On my desktop I use Windows7 Ultimate where I can play those games. But in my Laptop I use Windows Vista Business ( I bought my laptop in 2008 :-( ). There is no game option. And a few days ago I installed Windows 8 Pro but there is the same problem. No game option. On my laptop I used a trick to play those games. And also  in some Edition of Windows like Windows 7 Business and in some editions of Windows 8 there is no option for games in the Start Menu ( actually in Windows 8, there is no start menu button :-p ).
W T F ? I really like those games.
So what is the solution? With that same trick I was able to play those games in windows 8.
Now I am going to tell you the trick " How to activate default games in Windows Vista/7/8 "
Actually these games are not removed in those editions of Windows OS. Microsoft hides this feature for some reasons ( only Microsoft can explain the reasons :-D ). But they did not remove these games fully.
This trick turns on the hidden windows features. For this trick no need of any software.
Step 1 :
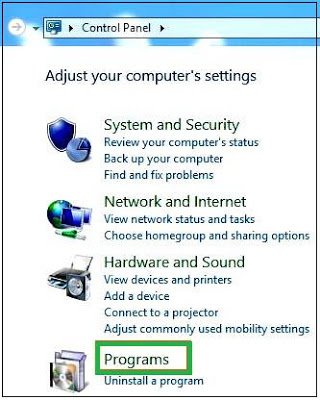
  • First go to your Control Panel.
  • Click on the " Programs ".
Control panel >  Programs

Step 2 :
  • Then go to " Turn windows features on or off "
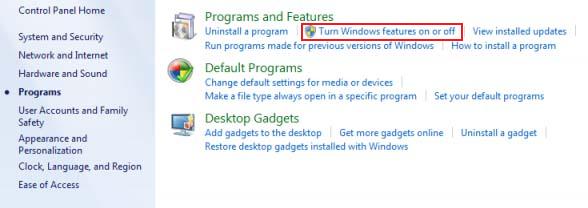
Turn windows features on or off

Step 3 :
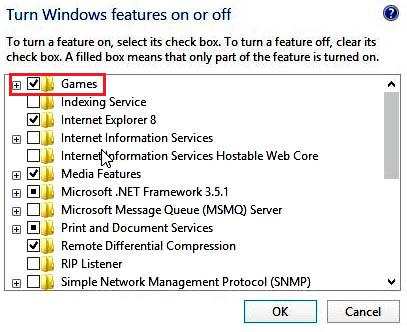
  •  Now a new window will appear like this..
  • Turn windows features on or off 
  • Tick on the box " Games "
  • And click now OK
Just wait for some time and the default games will appear in the Start Menu. Now enjoy ... \m/

Your Computer Welcomes You After Start up With Its own Voice - DT
Hope you all saw many Si-Fi movies. In those movies you must see that the computer welcomes its user when they turn on the computer.
How it will be if your computer welcomes you after start up?
Today I am going to tell you how to set up your computer which will welcome you with its voice after every start up without using any software. Just with the help of Notepad, we will make the whole process.
Step 1 :(Open Notepad)

First of all you need to open notepad.To open Notepad follow the steps :
Start > All Programs > Accessories > Notepad

Step 2 : (Writing code and saving the file)

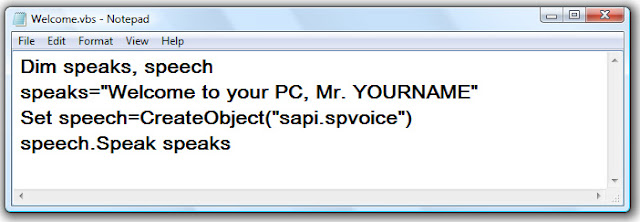
Now in Notepad write the below code-
Your Computer Welcomes You After Start up With Its own Voice - DT
Dim speak,speech
speaks="welcome to your PC,Mr.Yourname"
set speech=Createobject("sapi.spvoice")
speech.Speak speaks

Replace  Welcome to your Computer, Mr. YOURNAME with your own.
And now you have to save it in vbs format.

Your Computer Welcomes You After Start up With Its own Voice - DT
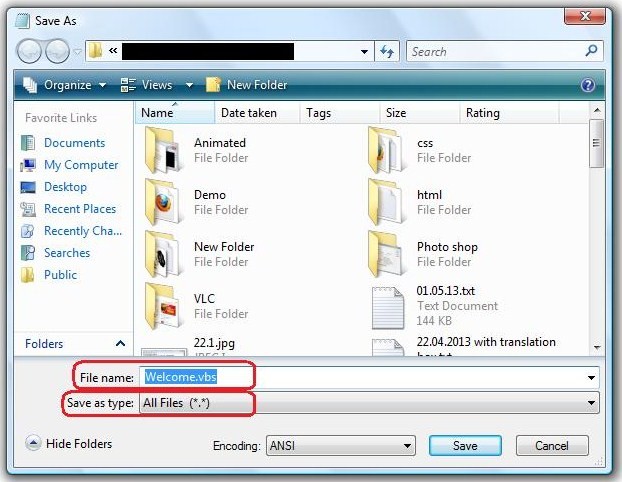
File > Save as > 
  • In the File name box write Welcome. vbs
  • In the Save as type select All Files (*. *)
Now click on Save.
 Step 3 : (Adding in startup programs)
To launch the program after every start up you have to add the file in the startup program list.
  • So first of all Copy the Welcome .vbs file.
  • And paste the file in the directory below -
    C:\Documents and Settings\All Users\Start Menu\Programs\Startup ( For all windows xp/vista/7/8 )
    C:\Users\{user name}\AppData\Roaming\Microsoft\Windows\Start Menu\Programs\Startup ( For vista/7/8 )
N.B. : AppData folder is generally a hidden folder so before doing this unhide this folder
Now you are done. Now restart your computer and see the magic.

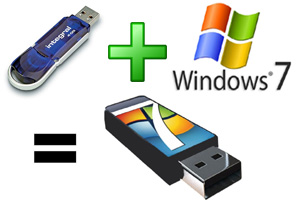
How to make pendrive/Usb Bootable easily-DTGenerally we install  windows from CD/DVD Rom. It takes more time to install windows. Have you ever tried to install windows from Pendrive/USB Stick?
If you install windows from USB Stick/Pen-drive , it takes less time than DVD/CD Rom. If your DVD or CD Rom is not working then it  is the best way to install windows. In  which computers (Netbooks) DVD Rom is not available, Boot-able pendrive is most important thing to install OS, Live DVD/CD and others.
So today I am going to tell you what is the process to make Pendrive bootable. I will tell two easy methods-
1. Dos/cmd Method
2. Software method

Method 1
:

( Make Pendrive/ USB Stick bootable by Command Prompt )
Without any software using command prompt you can make bootable pendrive very easily.Just follow these below steps-
Step 1 :
First of all format your Pendrive/USB stick in NTFS format.
If you are using Windows Vista/7/8 then format the pendrive just in NTFS format not in FAT32.
Format with NTFS
Or you can use Command prompt to format your pendrive in NTFS format.
Make pendrive bootable using dos-DT
  • Open command prompt (Start >All Programs >Accessories > Command Prompt)
  •  Write command :
    convert H:/fs:ntfs   [ H:=Pendrive's letter ]
  • After sometime pendrive will be formatted in NTFS format.
 Step 2 :
 Now insert the CD/DVD into your DVD drive.
Step 3 :
Now go to command prompt and Run it as Administrator
(Start >All Programs >Accessories > Command Prompt [Right click >Run as Administrator])
Step 4 :
 Write command :
       F:          [ F:= in this drive you inserted windows dvd/cd,change it as your computer shows ]
       cd F:\boot     
       bootsect /nt60 H:    [ H:=Pendrive's letter ]
Step 5 :
You are almost done...
Now copy the whole DVD/CD and paste in the Pendrive/USB Stick.
 Now you can setup windows from your pendrive.No need of DVD/CD drive.
Method 2 :
( Make Pendrive/ USB Stick bootable by a Software )
I have tried many softwares to make a USB stick bootable and these cannot satisfy me. After long time I got a software, by which you can make bootable pen drive easily. This software size is only 700 KB.
 Step 1 :  
First of all download it from the below link-
Step 2 :
Unzip it and run it.A Window will appear-
How to create pendrive bootable-DT
Step 3 :
Now select your Pendrive ,Tick in Quick Format and select the ISO/DVD/Source File.
Bootable pendrive-DT
 Now click Do it!
You are done, The software starts working ..
Easy way to make bootable pendrive-DT
After complete, below window will appear-
Bootable pendrive is ready-DT
Your Bootable windows pendrive is ready.
N.B. :
In Boot Menu set the pendrive as first boot device in BIOS setup

When you turn on your desktop computer, normally you hear a Beep sound coming from your CPU. Then your computer starts. But sometime you heard many Beep sounds from your CPU. Then you found there are some problems with your computer. Result your PC does not start.
Today I am going to tell you how can you find out the problems hearing those beeps.
So when the computer begins to boot, listen very carefully to the BEEP sounds


1 Beep :
Your computer has no problem. The PC starts normally.
2,3 & 4 Beeps : Check the  RAM whether it is in the right slot in your CPU. Remove RAM from the slot and reinsert in it if needed.
5 Beeps : Check out motherboard connections properly with all cards ( like-Graphics card, Sound card etc. ).
6 Beeps :
Check the keyboard connection with motherboard properly.
7 Beeps :
Check the processor's connection whether it is connected properly.
8 Beeps : If there is any problem with your Graphics card, then these beeps can be heard.
9 Beeps : This is very unusual.If there is a major problem with your bios, then these beeps are heard.
10 Beeps : Means CMOS Chip is not working.
( N.B. : To hear beeps, you should have internal speaker in your CPU. Some Motherboards provide an inbuilt speaker. If they do not provide any speaker, you can add speaker manually. )

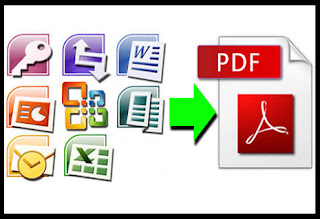
Word to PDF
PDF = Portable Document File.

Without needing to have the same application or fonts on your computer, PDF files let you view and print a document as the author designed it,
  • To view or print a PDF file, you need the Adobe Reader®, version 5 or later, on your computer. You can download a free copy of Adobe Reader® from the Adobe website.
  • Installation instructions are available from the Adobe website.
You read PDF files every day, in your office, home, schools, colleges in one Line "You use PDF files EVERYWHERE".
Suppose you are working in MS WORD but you need that file in PDF format immediately. But It is very difficult to make a pdf file via Adobe/Acrobat. It is a lengthy and complicated process. Or else you need to install Word to PDF converter on your computer (Like: Quick Word to PDF) or you Upload the file in a website it is converted into PDF (Like: www.pdfonline.com/convert-pdf/ etc. etc. ).
But have you ever tried to make your own PDF file in your computer in OFFICE platform?
Ans: Yes, but don't know the procedure.
Today I am sharing a tip to make PDF files from a MS WORD file or even from any other MS OFFICE applications in the MS OFFICE platform in your computer instantly.
For this you have to install a small plugin provided by Microsoft ®. Click the below Download link to download the plugin for MS Office 2007.

Download Word to PDF

  • In the page Click " DOWNLOAD " as shown in the below picture.
Word to PDF

To install this download:
  • Download the file and save the file to your hard disk.
  • Double-click the SaveAsPDF.exe file on your hard disk to start the Setup program.
  • Follow the instructions on the screen to complete the installation.
Instructions for use:
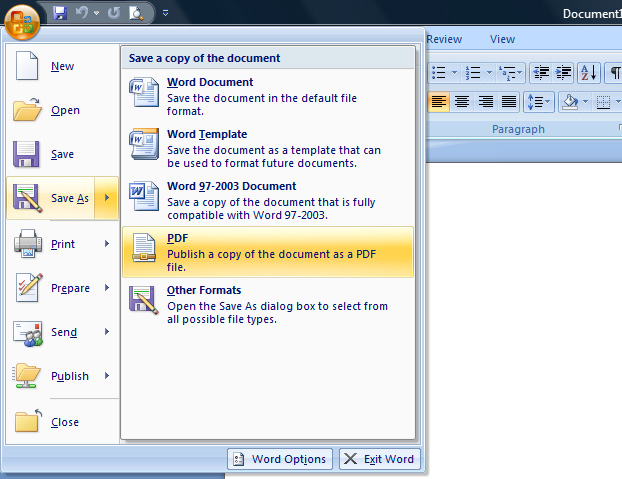
  • After you install this SaveAsPDF, open the document which you want to publish
  • Select save to PDF from the Office or File menu.
Word to PDF

This download works with the following Office programs:
  • Microsoft Office Access 2007
  • Microsoft Office Excel 2007
  • Microsoft Office InfoPath 2007
  • Microsoft Office OneNote 2007
  • Microsoft Office PowerPoint 2007
  • Microsoft Office Publisher 2007
  • Microsoft Office Visio 2007
  • Microsoft Office Word 2007

Who are using Windows 7 (32bit) , they have faced a RAM problem that they cannot use the full 4gb RAM. It is locked by Windows. That's why we use windows 7 64bit.

But with a little PATCH FILE we can use the 4gb RAM fully.
This patch program creates a copy of windows7's kernel file " ntkrlpa.exe " automatically and saves the file as " ntkrllCE.exe ". Then the patch program opens the lock from " ntkrllce.exe " and creates an extra Windows7 boot menu and adds the new kernel file in it.
It means by original kernel file "ntkrnlpa.exe" or new kernel file "ntkrllCE.ese", windows will be bootable.
Before patching ::


After patching ::


How to patch ?
First of all you should download the patch file

NB:: Beware of ANTIVIRUS of your PC.It seems to the Antivirus that the file is a VIRUS. But  this program is virus free. So disable your antivirus while patching.
Step 2 :
Open the patch. Then click on PATCH x86 Ramlock. Then restart your computer.


Step 3 :
Then you will find the there will be an extra boot option. Don't panic. Log in with the new one.
Step 4 :
After login if you find the same as below picture...

Step 5 :
Then open the patch file again. And click on Remove Watermark. Then restart your computer.

Step 6 :
Now you have to configure boot option. So open the patch and click on Start msconfig

Step 7 :
Now you have to click on Boot and select the new boot option and click on Set as default.

If you do not want to make this boot option as your default boot option , then skip this step.
Now you are done...


We can download many files one by one with IDM (Internet Download Manager). For this we have to use “ synchronization queue ”.
Step-1: Open IDM and click on “ Scheduler “

Step-2: Then “ synchronization queue > files in the queue > select 1 > Apply > ok hen select synchronization queue

Step-3: Now while downloading a file click on “Download Later “

Step-4: Then select synchronization queue

Step-5: If you want to move older files in synchronization queue, then select  those files and right click > Move to synchronization queue
Step-6: To start Synchronization queue , at first stop all download and select Synchronization queue.

Usually computer is attacked by viruses. My computer also faces at least one virus every day. Many times those viruses disable “Task manager”or some antivirus  disable it. So if you want to stop a running task you have to open the task manager. But it was disabled by viruses. Upsssss…  :( :(
Here I'm going to show you how to stop a running file with the help of Command Prompt. No need of Task manager.


Step-1 : Start “ cmd.exe "
       
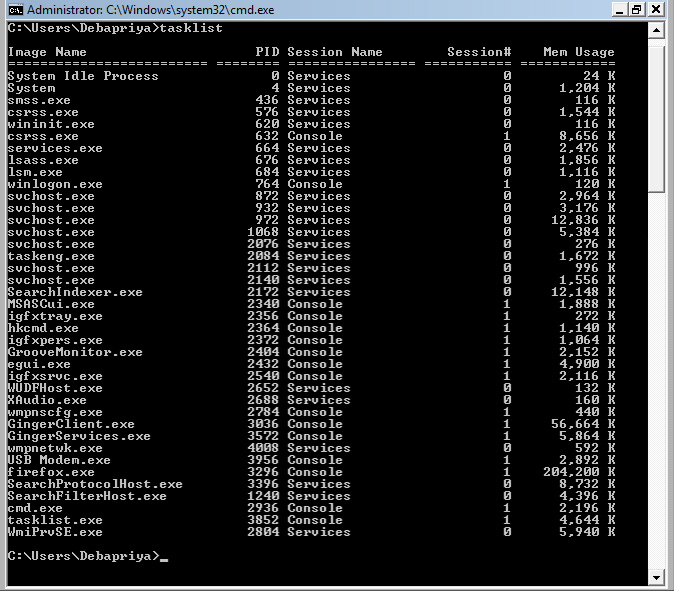
Step-2 : Write “ tasklist ”(without quote) and press “Enter “
Then you will see the list of running files. like below-

cmd
Now suppose you want to stop “cmd.exe”

Step-3 :  So write “ tskill cmd “ (without ” ”)
Cmd .exe will be closed.

Debapriya Maity

{google-plus#https://plus.google.com/107141682524970441767}

Contact Form

Name

Email *

Message *

Powered by Blogger.
Javascript DisablePlease Enable Javascript To See All Widget