Halloween Costume ideas 2015

Dev Tunes

Latest Post

All of you are well known about torrent website.
From these website we download Movies,Games,TV Shows,Softwares, Videos,Music and many other things.
I am from INDIA.In India most of users download mainly Movies and Videos.So today I am going to show you how to download a file from these torrents sites.Like- 

  • www.torrentz.com
  • www.extratorrent.com
  • www.kickass.to
  • etc etc

So what is torrent ?

Wikipedia says that

torrent file is a computer file that contains metadata about files and folders to be distributed, and usually also a list of the network locations of trackers, which are computers that help participants in the system find each other and form efficient distribution groups called swarms. A torrent file does not contain the content to be distributed; it only contains information about those files, such as their names, sizes, folder structure, and cryptographic hash values for verifying file integrity. Depending on context, a torrent may be the torrent file or the referenced content.
Torrent files are normally named with the extension .torrent, as in MyFile.torrent
Typically, Internet access is asymmetrical, supporting greater download speeds than upload speeds, limiting the bandwidth of each download, and sometimes enforcing bandwidth caps and periods where systems are not accessible. This creates inefficiency when many people want to obtain the same set of files from a single source; the source must always be online and must have massive outbound bandwidth. The BitTorrent protocol addresses this by decentralizing the distribution, leveraging the ability of people to network "peer-to-peer", among themselves.
Each file to be distributed is divided into small information chunks called pieces. Downloading peers achieve rapid download speeds by requesting multiple pieces from different computers in the swarm. Once obtained, these pieces are usually immediately made available for download by others in the swarm. In this way, the burden on the network is spread among the downloaders, rather than concentrating at a central distribution hub or cluster. As long as all the pieces are available, peers (downloaders and uploaders) can come and go; no one peer needs to have all the chunks, or to even stay connected to the swarm in order for distribution to continue among the other peers.
A small torrent file is created to represent a file or folder to be shared. The torrent file acts as the key to initiating downloading of the actual content. Someone interested in receiving the shared file or folder first obtains the corresponding torrent file, either by directly downloading it, or by using a magnet link. The user then opens that file in a BitTorrent client, which automates the rest of the process. In order to learn the Internet locations of peers which may be sharing pieces, the client connects to the trackers named in the torrent file, and/or achieves a similar result through the use of distributed hash tables. Then the client connects directly to the peers in order to request pieces and otherwise participate in a swarm. The client may also report progress to trackers, to help the tracker with its peer recommendations.
When the client has all the pieces, it assembles them into a usable form. It may also continue sharing the pieces, elevating its status to that of seeder rather than ordinary peer.
Source : Wikipedia-torrent

What you need to download from these website ?

  • High-Speed Internet
  • A torrent client (I suggest Î¼Torrent ) 
Download  Î¼Torrent from this link (for Windows users):

Okey.You have High speed internet and you have downloaded  Î¼Torrent.Just install it in your PC.
....
..
Installing done.
Now open a torrent website.Like-
It will looks like : 

There are main THREE thins to notice in this website.
  • Search Box
*******************************************************************************

Searching a Movie:

Now, Just enter a movie name in search box ( Like : Rio 2011; Rio- Movie name, 2011- Initial release year )
See the result like :


Choosing a link from where you will download:

  • Choose a link which " S " & " L " are more than 1000,each.Because a link containing more seed and leech is faster in downloading speed than any other link.In extratorrent.com  "S"&"L" should be minimum 1000.See the example: 

  • These marked link are usually faster in downloading speed than any other link.
  • There will be the movie in different size(Located on the left side of " S"& " L".Choose a size in which you are  comfortable.It may be in GB or MB.But notice the "S"&"L".

Main downloading process:

  • So u have chosen a link. Just click on it.
A new page will appear.
  • In that page you will find the full description of that torrent file.(See above animation).Under the description box you will find movie's description,Screenshots of the movie,User comments and many more.
One more step to download the movie.
  • In that page you will find a box named " Download torrent: "
  • Just click on the link as shown in the below animation :

A torrent file will download in your computer.Just open it.Then  Î¼Torrent will open automatically.Just click "Ok".Download will start automatically.

Now you can see the download speed,ETA etc.You can pause/resume,Stop your download.
So start downloading... Enjoy. \m/
  • There is an another good torrent site - www.kickass.to
  • Main facility of this website is if "S'&"L" is less than 1000,it will not effect on downloading speed.If downloading speed is very slow then try another link.

  • Download procedure is same.

How to host a website in Google Drive with Custom Domain
Google Drive is definitely a very good service provided by Google. It lets us to store files online.
From now Google Drive will allow web developers to host a website in it for free with 15 GB space. They announced it officially. It means all you do have to store your HTML, JavaScript, CSS files in it. Just like how you upload files requires for a website to a server.
It's a small update but a big news for web developers. So I made a website and hosted it in Google Drive. You can see live demo here :
 
Though I don't recommend you Google Drive as main hosting but it is very useful for demo website. If you are a designer then you need to demo your work for your client, then this is very useful.
In previous article I told you Why you should let Google Drive to host a file and How to store files in Google Drive. (I showed about how to host JavaScript or CSS file. Same way you can upload your files.
What you needed to host a website in Google Drive. Google's goal is mainly to get more people using Google Drive in internet as well as computing services. If you are already a user of Google Drive you may find this more effective than SkyDrive or Dropbox.

What to do to host a website in Google Drive?

  • Make your necessary files for the website.
  • Create a Folder in Google Drive
  • Share the folder as " Public on the web "
  • Upload your files (HTML, JavaScript, CSS and other files) in that folder.
  • Share the URL that looks like https://googledrive.com/host/....

Complete Guidelines with example for hosting a website in Google Drive :

Step 1 : ( Developing necessary files and folders for a website )

How you build a website that's your choice. You can make website trough simple html editor or you can use third party software ( like Artisteer ). So any how develop your necessary files. It may be consisted of HTML, JavaScript, CSS or any other files. A web developer is well known about it.
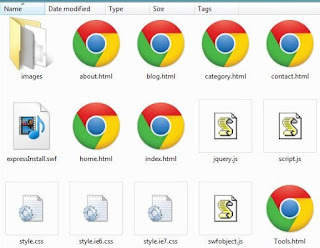
For example I use " Artisteer " to make necessary files in very short time. Here is the screenshot of necessary files : 
How to host a website in Google Drive with Custom Domain

Step 2 : ( Creating a folder in Google Drive and share as "Public on the web" )

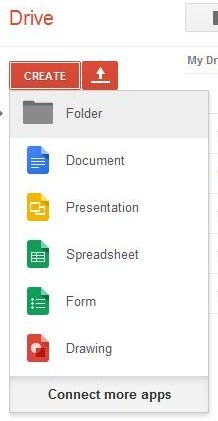
  • Firstly go to Google Drive and click on the CREATE option, then select Folder and name it. ( Like : Dev Tunes Website )
How to host a website in Google Drive with Custom Domain
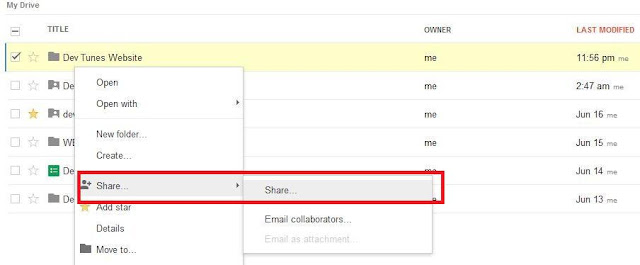
  • After creating the folder right click on it and click on " Share ".
How to host a website in Google Drive with Custom Domain
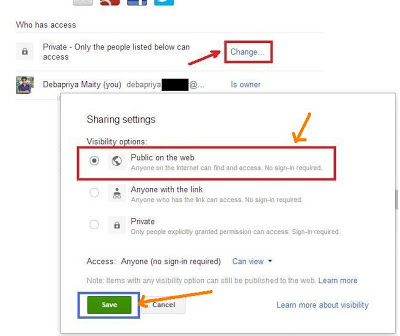
  •  And select " Public on the web " under " Who has access ".
How to host a website in Google Drive with Custom Domain

Step 3 : ( Uploading the files and folders )

Next in that folder you have to upload your files and folders. So click on the upload icon next to CREATE option and upload the files ( and folders if necessary ). For example see below :
How to host a website in Google Drive with Custom Domain

Step 4 : ( Get the link of your Website hosted in Google Drive )

The last step is getting the link. To get the link Right click on your desired file ( like: index.html ) and click on " Details " then in right side details box you can find your link somewhat looks like

  
Now your website is online. You are done.

How to add a Custom Domain for a Google Drive hosted Website ?

Although Google does not allow to add a custom domain for Google Drive hosted website. But with a the help of this website : http://gweb.io/ you can add a custom domain for your website. Just follow the steps :

Step 1 :

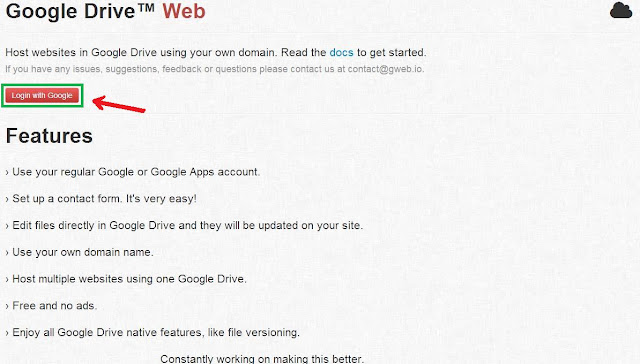
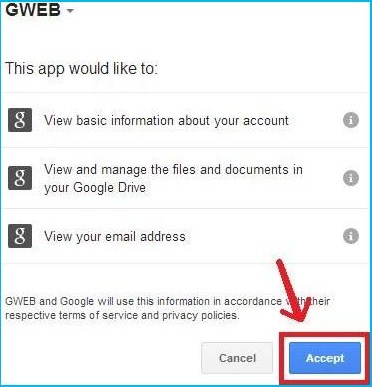
On that website click  " Login with Google ". Then it will be redirected to a request permission Page and there click " Accept ".

How to host a website in Google Drive with Custom Domain
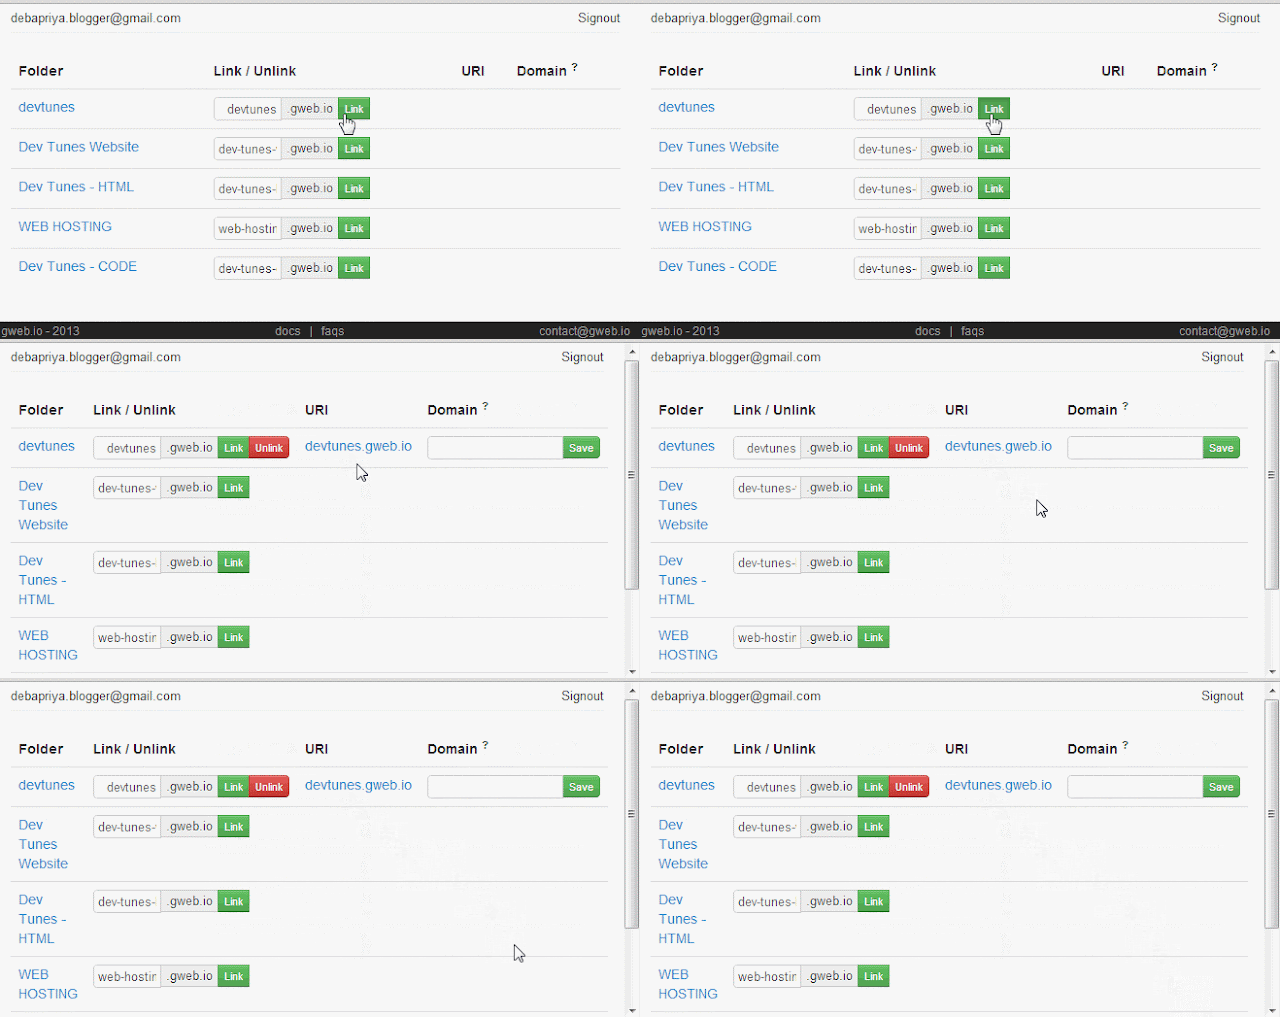
Then it will take you a page containing your Google Drive files and folders. There you can easily find the folder in which your website's files and folders are hosted.
Click on the " Link " button beside the desire folder name. See an example :
How to host a website in Google Drive with Custom Domain
Then URI would somewhat like devtunes.gweb.io and " Domain? " box will be blank. Now go to your browser, type { devtunes.gweb.io } and enjoy your website. 
Note : The folder should contain an index.html file of your website. Otherwise it will just display a list of files present in that folder.

Set up your own Domain

And in the " Domain? " box you can add your Custom Domain. But before adding  a custom Domain you have to do two things.
1. Modify your domain's DNS :
Login to your DNS management account. Add or modify [ www.example.com ] CNAME record and point it to [ example.gweb.io ].
2. Set your domain on gweb.io :
You have to go to the gweb.io panel and set [ www.example.com ] as the domain for [ example.gweb.io ]
  • Without www, if you want to access example.gweb.io via example.com , you need to set up the DNS For [ example.com ] like this:
Add/modify three A records and point them to:

    75.101.163.44
   75.101.145.87
   174.129.212.2

    N.B. : Don't forget to add the domain [ example.com ]  in the gweb.io panel beside the URI link. See Docs for further information.
Now in the address bar type [ example.com ] or [ www.example.com ] and enjoy your website.

How to host Javascript or CSS in Blogspot using Google DriveHello guys, you all know that for a webmaster JavaScript and CSS are the most important things to develop a website.
  • To define the style information <style> tag is used in an HTML document. CSS coding is put between two <style></style> tags. It describes that how an HTML document should render in a Web Browser. 
  • <script>tag is used to define scripts like JavaScript. This tag contains Scripting statements or an external file/document through "src" attribute.
And each HTML document may contain multiple <script> tag.
Generally these consist  of very long code. And multiple Script slows down the page loading rate and also decrease the rate of SEO. So a webmaster prefers to add their whole stylesheet/script in one file which they can upload in a website and after that they can apply these  very easily.
In Blogspot you can use JavaScript and CSS whatever you want. But blogspot does not let us to host Javascript and CSS file. We can add raw code. So most of us added Javascript and CSS directly into blogger template. But the template editor editor is very small in size. So our faces many problems while editing a template.
Although Blogspot has few limitations that stop you from hosting a Javascript or CSS file. So you have to upload these to a third party website. But also on those website sometimes you faces problem like-those website loading speed is not good, not enough bandwidth, sometime you have to pay for hosting above all security.
Luckily Google Drive solves these problems. Using Google Drive we can easily host anything as well as Javascript or CSS or HTML file for free. And you can use these files directly to your website.
Today I will show you How to host JavaScript or CSS in Blogspot using Google Drive .

Why you should let Google Drive to host files for you ?

  • Lots of Space: Google drive lets you 15 GB space for hosting to a regular account. It is sufficient to host a large number of Javascript/CSS files. However you can upgrade your account. If you do not want to upgrade  just use this service through another an account and you will get another 15GB space. There is no limitation to create multiple accounts in Google. So Cheers guys you can  put your whole computer in Google Drive. LOL :-D.
  • Reliable as well as Dependable : With unlimited bandwidth Google Drive provides you to host anything as you like with full freedom. There is no limitation or any kind of condition.
  • Better security : Google has always proven that they are the best in security all companies. Google Drive is one of their services with unlimited bandwidth. Moreover to serve maximum security Google Drive usages HTTPS encryption to keep your document safe.
  • Automatic Backup : Google Drive creates a backup (new revision) of your file whenever you make changes to a file. Google tracks your changes all time. So you can revise the file and restore that version.
  • Sharing Option : You can share a file to anyone or you can make it private. You can select the option for others to comment, share, view or edit your stuff.
  • Free Free Free : Completely Free : You can use all these features for FREE. No charges apply. 

How to host a JavaScript or CSS in Blogspot with Google Drive ?

There are several third-party Apps that let you to host your Javascript or CSS like Google Code, Google apps, Google Appbot. But the procedure to host files is more complex than Google Drive. Hosing at Google Drive is very easy and no need to worry about the bandwidth.
Step 1 : ( Creating .js/. css file from your template )
To host JavaScript/CSS you need to make .js/.css file from your template. To make these file you need Notepad.
First of all : Go to blogger.com » Your blog » Template » Edit HTML » And search for  <b:skin><![CDATA[/*
 and copy the code till   ]]></b:skin> 
How to host havascript or CSS in Blogger
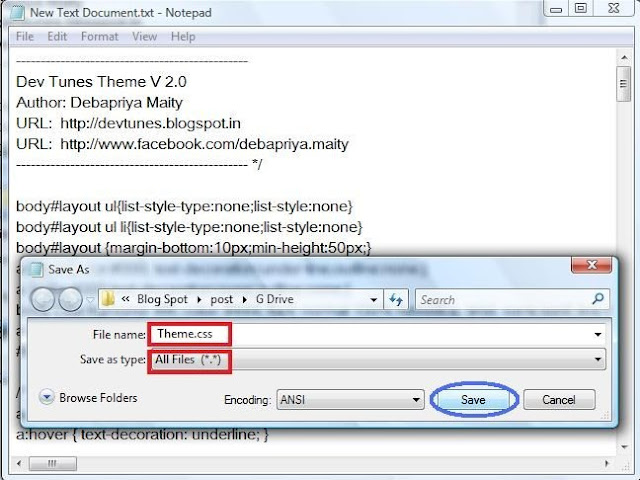
Then paste it in Notepad. And also remove it from the template. After pasting it in Notepad save it [ name.css ]
The extension should be in .css so that a web browser can understand it as a StyleSheet. See an example:
How to host havascript or CSS in Blogger

Step 2 : (Creating a Folder in Google Drive )
Now you have to upload the file to Google Drive.
First go to Google Drive and Log in with your Gmail account.
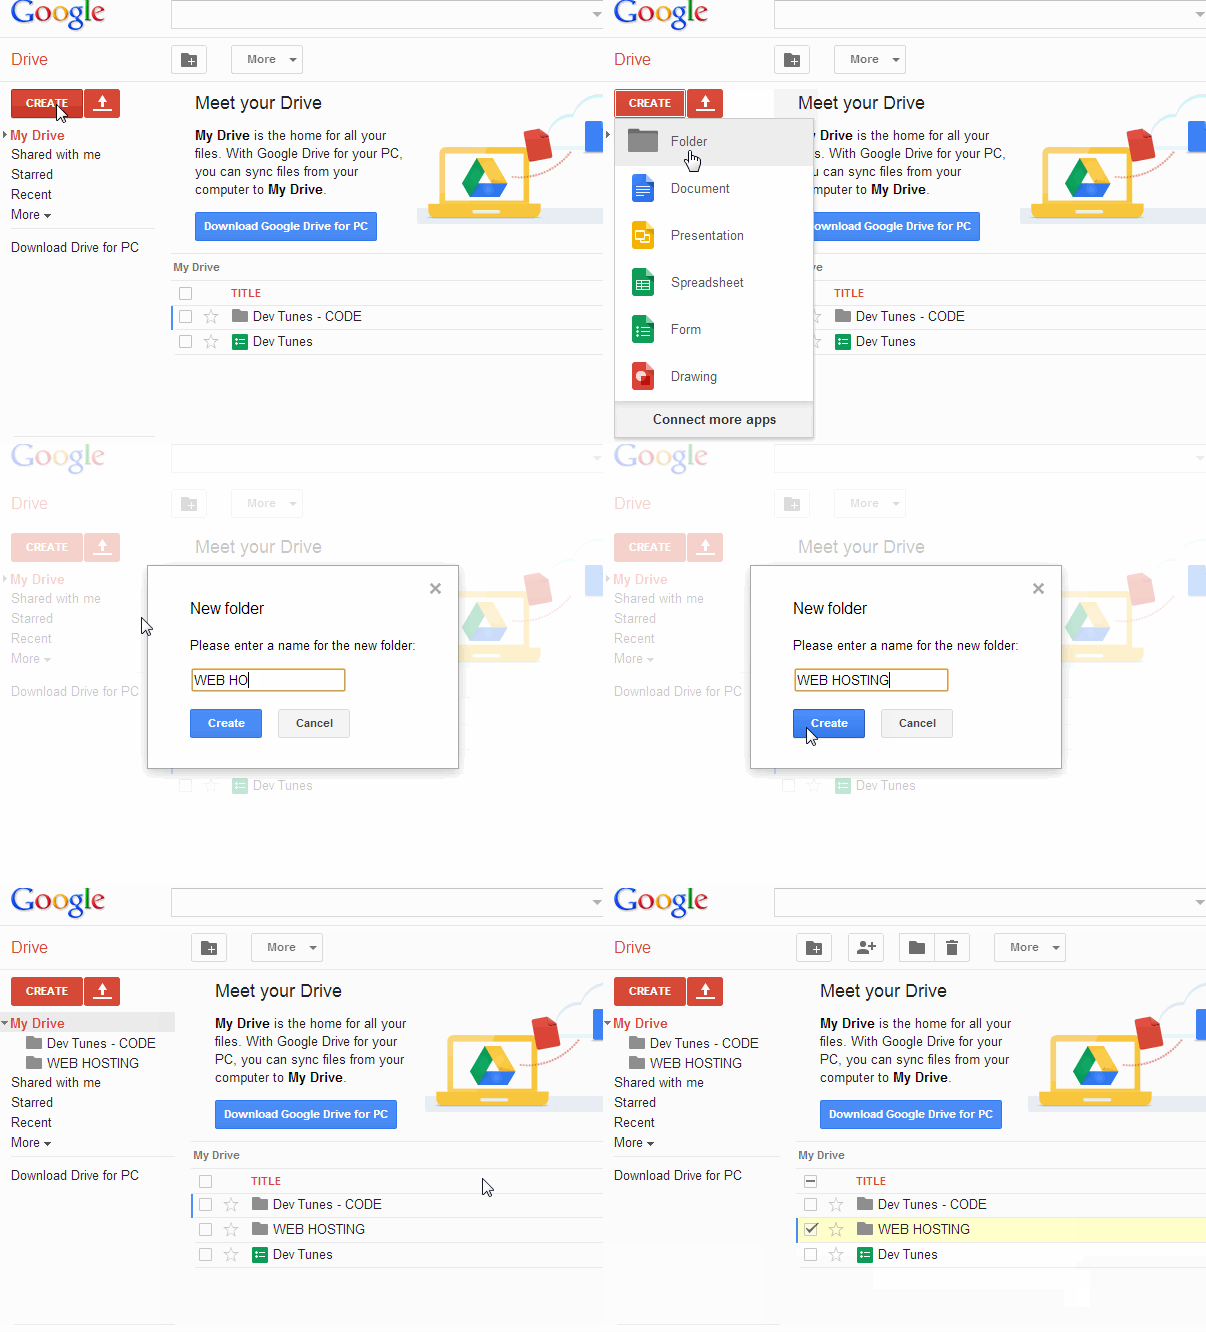
Now you have to create a New Folder where you can store your files. So click on CREATE then click on Folder in the drop down list. Now name the new folder whatever you want. Now Click on Create. For example see the below image :

How to host havascript or CSS in Blogger
Step 3 : (Uploading the file to the Folder)
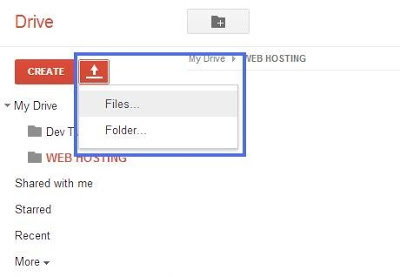
Now double click on the newly created folder. Then click on the Upload icon on the left side of the window beside the CREATE button. And a drop down list will appear and then select Files.
How to host havascript or CSS in Blogger

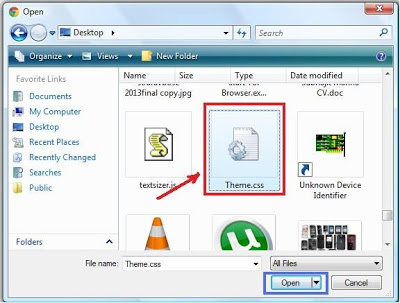
Then select the files and Click Open.

How to host havascript or CSS in Blogger
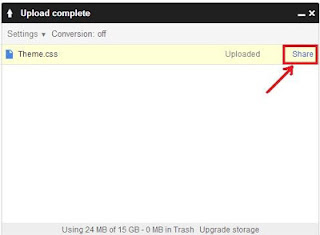
Then a small uploading window will appear on the right side. After uploading complete click on " Share " . See example:
Then a new window will appear. And then click on " Change "(Who has access). An another window will open
After that select " Public on the web ". Then click "Save". Then click " Done ".
For example see the below image :
How to host havascript or CSS in Blogger
Step 4 : (Get the proper Hosting Link )
And the second last step is to prepare the proper hosting link of the .css file. So right click on the file which you uploaded few moments ago and select share.
How to host havascript or CSS in Blogger
After that copy the URL under " Link to share "
How to host havascript or CSS in Blogger
The copied URL would somewhat look like :
https://docs.google.com/file/d/0BwJHRoWkN1kONThfZTJ5eDUyRzQ/edit?usp=sharing


Replace the link https://googledrive.com/host/[File id]
Remember: Your file id should be same before and after the change.
Example:
Google doc link:
https://docs.google.com/file/d/0BwJHRoWkN1kONThfZTJ5eDUyRzQ/edit?usp=sharing
Google Drive Host link:
 https://googledrive.com/host/0BwJHRoWkN1kONThfZTJ5eDUyRzQ/

Step 5
 : (Adding the hosted .css into Blogger )
After preparing the hosting code now the time to add the link to blogger template. Go to blogger.com » Your Blog » Template » Edit HTML » And put the code before <head> tag as below the structure.
<link href="https://googledrive.com/host/your-file-code" rel="stylesheet"></link>
Do not forget to remove the CSS code as I told in Step 1.
In the same process you can host a Java script. Then the coded structure will look like :
<script src="https://googledrive.com/host/0BwJHRoWkN1kOOE41LWlUMXhTcGs" type="text/javascript"></script>

Games on Windows 8
Did you play Chess Titans, Mahjong Titans,InkBall, Minesweeper,Purble Place, FreeCell, Hearts, Solitaire, Spider Solitaire ? Playing these games is one the best way to time pass. Whenever I am free I play Hearts.
On my desktop I use Windows7 Ultimate where I can play those games. But in my Laptop I use Windows Vista Business ( I bought my laptop in 2008 :-( ). There is no game option. And a few days ago I installed Windows 8 Pro but there is the same problem. No game option. On my laptop I used a trick to play those games. And also  in some Edition of Windows like Windows 7 Business and in some editions of Windows 8 there is no option for games in the Start Menu ( actually in Windows 8, there is no start menu button :-p ).
W T F ? I really like those games.
So what is the solution? With that same trick I was able to play those games in windows 8.
Now I am going to tell you the trick " How to activate default games in Windows Vista/7/8 "
Actually these games are not removed in those editions of Windows OS. Microsoft hides this feature for some reasons ( only Microsoft can explain the reasons :-D ). But they did not remove these games fully.
This trick turns on the hidden windows features. For this trick no need of any software.
Step 1 :
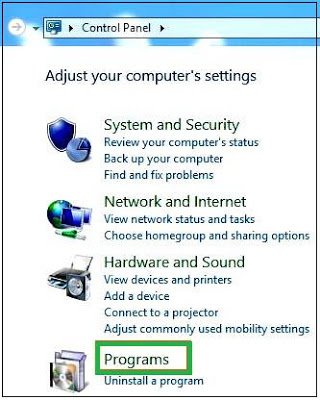
  • First go to your Control Panel.
  • Click on the " Programs ".
Control panel >  Programs

Step 2 :
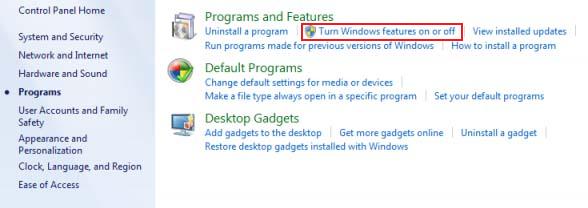
  • Then go to " Turn windows features on or off "
Turn windows features on or off

Step 3 :
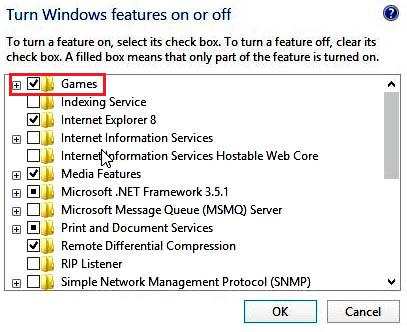
  •  Now a new window will appear like this..
  • Turn windows features on or off 
  • Tick on the box " Games "
  • And click now OK
Just wait for some time and the default games will appear in the Start Menu. Now enjoy ... \m/


How To Find HTML Color Code InstantlyFor making a website or editing a blog template appropriate color is very important. For web design every color has a color code in HEX value ( like: White- #FFFFFF ). We all know about it.
Sometimes we choose a color but we cannot find the HTML color code for that color. So we search in Google or else use a website to find the color code.

 
 There are so many websites to find the HTML color code for a specific color like
w3schools.com
HTML Color Codes 
Colorpicker.com
But when you are working offline then is is very hard to find that color code. Or you saw a color in a website/application/document. You liked it very much. But you cannot find that code for that color on those websites. So I am going to tell you How to find HTML color code instantly.
  • Just download this software (420.67 KB) from the below link.
How to find HTML color code instantly
  • Install it on your computer. After installing it will show in your Task Bar. Like this-
How To Find HTML Color Code Instantly
 This Software is developed by Instant Eyedropper.
How to use ?
Just Click on that icon in your task bar and hold it and then drag the mouse pointer to the desired color on your screen.

How To Find HTML Color Code Instantly

It will work everywhere in your computer screen. So you can pick color code from any application or document or website or in short whatever you see on your computer screen. In the above screenshot, you clearly see that how this software shows HTML color code from Google search page.


How To Resume Unfinished Torrent Download-DTWe usually use utorrent to download Torrent file like movies, softwares, videos. These are large in file size. Through many torrent download clients we can pause  downloads but sometimes we need to reinstall our operating system while files are downloading. So we cannot resume unfinished torrent file after reinstalling OS.We have to start it from beginning. Today I am going to tell you how to resume unfinished torrent download.

1. Always use the µTorrent client to download torrent files. If you do not have µTorrent, download from here.
2. Do not use magnet link, download manually.
3. You have noticed that before downloading complete, it creates the file fully in a specific folder on a specific drive. But we cannot use it. After downloading complete we can open/use that file.
4. Move those files & folders and torrent link files in a safe place before installing the OS.
5. Now install the OS. After installing the OS, install µTorrent. And copy the torrent file and other folders to the same drive and same folder.
6. Open the torrent file through µTorrent. Now in µTorrent window right click on this torrent file and right click on it. And then click on Force Re-Check.

How To Resume Unfinished Torrent Download-DT

Now downloading will resume from where it was stopped.

Your Computer Welcomes You After Start up With Its own Voice - DT
Hope you all saw many Si-Fi movies. In those movies you must see that the computer welcomes its user when they turn on the computer.
How it will be if your computer welcomes you after start up?
Today I am going to tell you how to set up your computer which will welcome you with its voice after every start up without using any software. Just with the help of Notepad, we will make the whole process.
Step 1 :(Open Notepad)

First of all you need to open notepad.To open Notepad follow the steps :
Start > All Programs > Accessories > Notepad

Step 2 : (Writing code and saving the file)

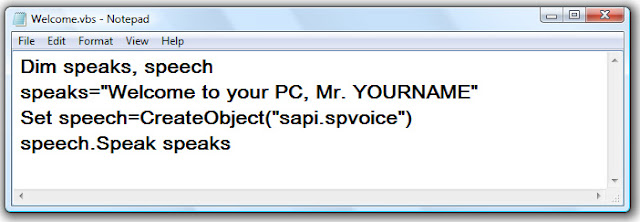
Now in Notepad write the below code-
Your Computer Welcomes You After Start up With Its own Voice - DT
Dim speak,speech
speaks="welcome to your PC,Mr.Yourname"
set speech=Createobject("sapi.spvoice")
speech.Speak speaks

Replace  Welcome to your Computer, Mr. YOURNAME with your own.
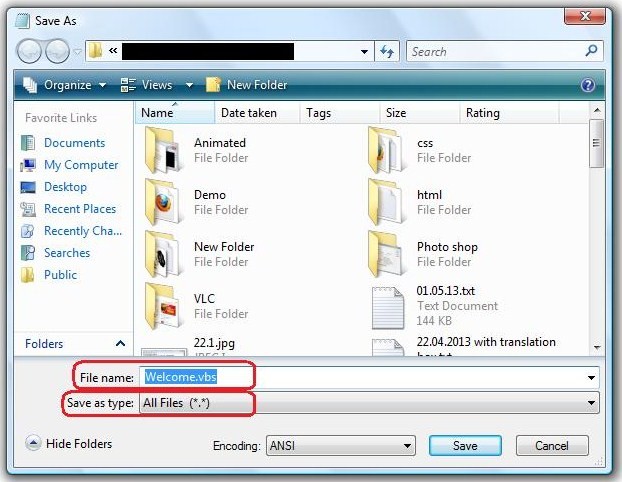
And now you have to save it in vbs format.

Your Computer Welcomes You After Start up With Its own Voice - DT
File > Save as > 
  • In the File name box write Welcome. vbs
  • In the Save as type select All Files (*. *)
Now click on Save.
 Step 3 : (Adding in startup programs)
To launch the program after every start up you have to add the file in the startup program list.
  • So first of all Copy the Welcome .vbs file.
  • And paste the file in the directory below -
    C:\Documents and Settings\All Users\Start Menu\Programs\Startup ( For all windows xp/vista/7/8 )
    C:\Users\{user name}\AppData\Roaming\Microsoft\Windows\Start Menu\Programs\Startup ( For vista/7/8 )
N.B. : AppData folder is generally a hidden folder so before doing this unhide this folder
Now you are done. Now restart your computer and see the magic.

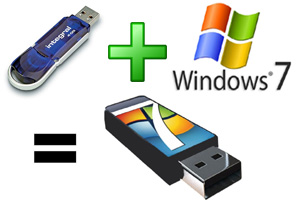
How to make pendrive/Usb Bootable easily-DTGenerally we install  windows from CD/DVD Rom. It takes more time to install windows. Have you ever tried to install windows from Pendrive/USB Stick?
If you install windows from USB Stick/Pen-drive , it takes less time than DVD/CD Rom. If your DVD or CD Rom is not working then it  is the best way to install windows. In  which computers (Netbooks) DVD Rom is not available, Boot-able pendrive is most important thing to install OS, Live DVD/CD and others.
So today I am going to tell you what is the process to make Pendrive bootable. I will tell two easy methods-
1. Dos/cmd Method
2. Software method

Method 1
:

( Make Pendrive/ USB Stick bootable by Command Prompt )
Without any software using command prompt you can make bootable pendrive very easily.Just follow these below steps-
Step 1 :
First of all format your Pendrive/USB stick in NTFS format.
If you are using Windows Vista/7/8 then format the pendrive just in NTFS format not in FAT32.
Format with NTFS
Or you can use Command prompt to format your pendrive in NTFS format.
Make pendrive bootable using dos-DT
  • Open command prompt (Start >All Programs >Accessories > Command Prompt)
  •  Write command :
    convert H:/fs:ntfs   [ H:=Pendrive's letter ]
  • After sometime pendrive will be formatted in NTFS format.
 Step 2 :
 Now insert the CD/DVD into your DVD drive.
Step 3 :
Now go to command prompt and Run it as Administrator
(Start >All Programs >Accessories > Command Prompt [Right click >Run as Administrator])
Step 4 :
 Write command :
       F:          [ F:= in this drive you inserted windows dvd/cd,change it as your computer shows ]
       cd F:\boot     
       bootsect /nt60 H:    [ H:=Pendrive's letter ]
Step 5 :
You are almost done...
Now copy the whole DVD/CD and paste in the Pendrive/USB Stick.
 Now you can setup windows from your pendrive.No need of DVD/CD drive.
Method 2 :
( Make Pendrive/ USB Stick bootable by a Software )
I have tried many softwares to make a USB stick bootable and these cannot satisfy me. After long time I got a software, by which you can make bootable pen drive easily. This software size is only 700 KB.
 Step 1 :  
First of all download it from the below link-
Step 2 :
Unzip it and run it.A Window will appear-
How to create pendrive bootable-DT
Step 3 :
Now select your Pendrive ,Tick in Quick Format and select the ISO/DVD/Source File.
Bootable pendrive-DT
 Now click Do it!
You are done, The software starts working ..
Easy way to make bootable pendrive-DT
After complete, below window will appear-
Bootable pendrive is ready-DT
Your Bootable windows pendrive is ready.
N.B. :
In Boot Menu set the pendrive as first boot device in BIOS setup

Debapriya Maity

{google-plus#https://plus.google.com/107141682524970441767}

Contact Form

Name

Email *

Message *

Powered by Blogger.
Javascript DisablePlease Enable Javascript To See All Widget